This article provides advice on replacing old bonnet or trunk lid stops with different types of attachments.

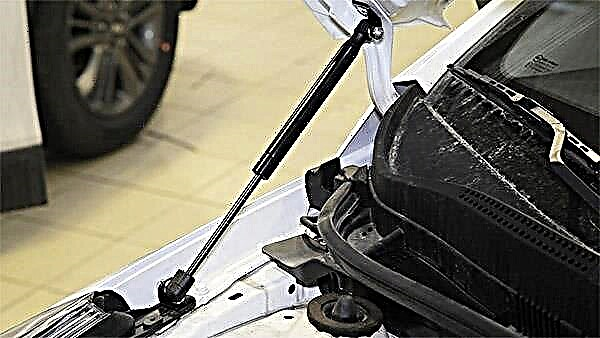
Gas-filled bonnet stops will wear out over time. These racks will work fine in hot weather, but they are best replaced.
When buying new parts, keep in mind that the boot lid and bonnet thrust struts may differ in length and type of attachment. Some have a swivel joint at the ends, and there are models with a combined fastening that combines hinges and a rigid fastening with a one-piece loop. There are products with a flattened support at the end of the stem, connected to a fixed fixing pin.
It is necessary to measure the length of the stops on the car in the extended position and buy a new part with the same dimensions. It would be even more correct to take the old emphasis with you to the store.

Prices for branded - high-quality shock absorbers (supports) for the hood or trunk of a foreign car in online stores vary within 2500-2800 rubles per pair. For domestic cars of the VAZ, Lada, etc. their cost can start from 300 rubles apiece.
After purchasing new suitable parts, you can start replacing the stop. The following instruction will help you to complete it.
Replacing stops - step by step instructions

- Open the trunk and support its lid with some sturdy wooden bar. It is advisable to replace both stops with bars so that it is convenient to work with them from either side.
- After installing the safety stops, parts are replaced. It is quite simple and takes no more than 10 minutes. The ends with swivel joints are secured with some kind of clamp. As a rule, either the flat clamp or the C-shaped version is used. The latter should slip through the bottom of the biscuit, and then under the ball. Only in this case will the fastening be reliable.
- It is important to properly push out the old shock absorber. Some car enthusiasts do this with a screwdriver, inserting it between the ball joint and the metal, and then pulling like a lever. For this purpose, it is better to use needle-nose pliers or a small screwdriver, with the help of which you should carefully lift the clamp from the cracker. Then all that remains is to pull the biscuit off the ball. The same manipulations should be repeated with the second end of the stop.
- The installation of a new part will be facilitated by applying a small amount of silicone grease to the inside of the cracker. For this, the clamps are installed in a half-open position. Then you need to pull a new cracker on the ball and snap the clamp.
- It also happens that the swivel joint does not have a clamp, and the ball joint is screwed to the body panel. In such a case, it is recommended to use a hexagon socket wrench to remove the old ball heel. The new heel can be screwed on with an open-ended wrench.
- If the stop is installed on a rigid mount, it is enough just to unscrew the bolt holding it.
- The pin mount should be disassembled with a lock washer or pin to prevent the stop from sliding off the pin. To release the lock washer, it must either be pushed or pulled in a specific direction. In some cases, it may be sufficient to nudge it slightly with the tip of a screwdriver. You can also grab the end of the washer with needle nose pliers and pull it out. After that, the old bonnet or trunk lid must be removed, a new one should be installed and the lock washer should be smoothly replaced until it clicks into place.
- Typically, the piston column has a coating that is resistant to external influences. However, when working, you still need to act carefully so as not to damage it. It is also important to install the new part correctly. If the old stop was piston down, the new one should be in the same position. A device containing nitrogen or hydraulic fluid will run smoother when pointed downward with the end of the stem.
- After installing new shock absorbers, you can remove the wood block holding the hood or trunk and enjoy the convenience of the system.