Consider the main points when replacing a manual gearbox, what not to do when removing a box and how to roll in after installation. Consider the main points when replacing a manual gearbox, what not to do when removing a box and how to roll in after installation.

Sooner or later the moment comes when it's worth looking at the gearbox. There may be several reasons, driver errors while driving, or a long service life, wear of parts. Any driver knows that the gearbox is one of the important components of the car that sets the drive wheels in motion.
A variety of gearboxes

Pictured is a robotic gearbox
Let's consider in a few words each type of checkpoint.
- Manual gearbox - in another way they also call manual. The oldest type of box, but well-proven by car enthusiasts who like to fully control the car and feel its power.
- Automatic transmission - also known and used for a long time in cars. Gear shifting takes place in automatic mode, but still, a command from the driver is required to change the direction of travel. Alas, the downside is that fuel consumption is higher and slow acceleration at the start (although in new cars with acceleration everything is already fine).
- Robotic box - made on the basis of a mechanical box, but with automatic control. It includes both an automatic transmission, for those who like not to monitor the engine speed, and a mechanical one, for those who like to step on the gas.
- The last type of variable transmission, while the main drawback is that they cannot be used on heavier models, except perhaps for small cars (although there are already known cases of installing a variator on a crossover with a 2.4 liter Honda CR-V 2015 engine). The change in speed occurs by changing the working diameters of the pulleys. The design of the variator allows you to change the gear ratio by stepless switching or, using the control electronics.
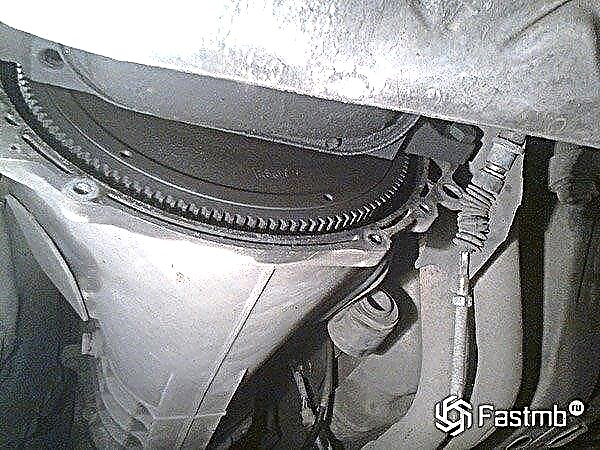
Removing the checkpoint

The most common is considered a mechanical box, in this article we will consider the principle of replacing mechanics. Most often, the gearbox is removed when replacing the clutch disc, eliminating leaking oil seals or gaskets, repairing the gearbox itself.
The first thing to start with is safety precautions, it is worth carrying out work only on a cold engine and gearbox, since there is also oil in the gearbox, with a long drive it will be heated and then it will be difficult to drain it without injury. If everything has cooled down, then we disconnect the battery terminals, since on some cars different sensors are installed at the checkpoint, then we remove the engine protection.
It is best to remove the box with an assistant, the weight is not large, but it is not so easy to grasp and hold it.

It is best to remove the box in the viewing room, as it will be convenient to lower it under the car. After preparation, drain the oil from the box and let it stand a little so that the oil is finally glass, then we rip off the nuts of the drives and wheels. If you decide to shoot in a pit, then you need to jack up the car in front and hold the front of the box in order to avoid the box and its other components falling when unscrewing all the bolts.

Now it is necessary to remove the clutch and disconnect the speedometer cable, since it is often located in the area of the checkpoint. Moving on to the ball joints, do not forget that the car must be lifted from the front, without doing this, it can simply collapse to the ground. After the ball joints, we remove the longitudinal stretch, if there are several of them, then we remove everything so that it does not interfere with disconnecting the box from the chassis. If the car is rear-wheel drive, then do not forget to disconnect the universal joint.

The most important point is to disconnect the drive from the box, it is best to do this with a partner, since you will have to pull out both drives. With the help of a mount, one pulls off the internal grenade, and the second at this moment pulls out the wheel to pull the drive out of the box.
When the internal grenade has been pulled out, you need to carefully and without knocking on the box insert a special plug (stopper) or the same old grenade. This is done so that the box does not turn or the differential does not crumble. Otherwise, then 100% will need to completely disassemble the box and put everything in its original position.

Next, we remove everything that will interfere with lowering the box from the body, it can be both the starter and the air conditioner compressor in some SUVs. Often there is a massive wire in this place, we also remove it. We turn off the reverse gear sensor, remove the cover and flywheel, wings for gear shifting (do not forget to outline the position in advance).

The most important point, we unscrew the bolts with which the box is attached to the engine. Do not forget about the engine, it will need to be secured with a hydraulic jack so that it does not fall to the ground, or by focusing on the side member glasses with a jumper above the engine.
Holding the checkpoint together, unscrew and remove all mountings to the body. Slightly shaking the box, try to move it away from the engine, this is about 10 cm, so that the input shaft comes out of the disc and basket. When removing, do not damage the petals on the clutch basket. Now you can safely lower the box under the car, if the car remains in this state for a long time, then we advise you to preserve open places to avoid dust and dirt.
Installing the checkpoint

Having removed the box, this is only 50% of the work, it is still worth installing everything back correctly. We will not consider the repair of the box itself, since there is a whole dilemma and each breakdown has its own approach for repair, a typical breakdown is late switching for automatic transmissions or crunching when switching for manual transmissions. Do not forget to reconsider whether all clutch assemblies are in good working order, since often when repairing a gearbox, the clutch disc, basket and release bearing are changed.
Before installation, it is worth lubricating the splined connection of the input shaft and the release bearing flange. You will also have to install it together. To do this, lower the engine a little with the help of a jack, insert the box all the way, in no case, you should not do this with the tightening bolts, only manually, having achieved a tight fit close to the engine.

Now it is worth tightening the main bolts of the gearbox to the engine, and we put the support for the box. We put on and adjust the clutch cable, for this the pedal should be about 1 centimeter higher than the brake pedal. We install a rear motion sensor, a starter, connect and adjust the gearshift mechanism (this is why we made marks on the lever in order to know exactly the position and simplify the adjustment).

After installing the gearbox, we proceed to the assembly of the chassis, insert the drives, remember that you also need to insert them carefully without knocking so as not to disturb the differential, otherwise you will have to remove the box again. Next, we fasten the ball joints and stretch marks. After tightening all the nuts and mounting bolts, lower the car. The last step is to fill the box with oil to a level, the level for each car is individual, it is best to look at it in the service book.
In principle, this is where the installation of the manual gearbox ends, first try to switch gears in the idle state of the car, there should be no crunch and all gears from the first to the last will easily turn on. Drive a 1 kilometer circle in low gears to get a feel for the car.After the oil has passed through the entire box, you can also higher gears 4th, 5th, 6th if there is one.